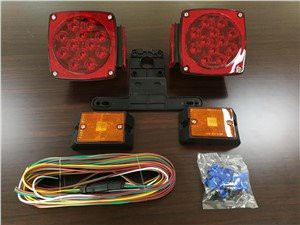
Installing LED trailer lights on a flatbed trailer is a task that can enhance both the safety and functionality of your trailer. As a supplier of Led Trailer Light, I've witnessed firsthand the benefits of making the switch from traditional Incandescent Trailer Light to LED lights. In this blog, I'll guide you through the process of installing LED trailer lights on a flatbed trailer, step by step.
Why Choose LED Trailer Lights?
Before we dive into the installation process, let's briefly discuss why LED trailer lights are a superior choice. LED lights offer several advantages over incandescent lights. Firstly, they are more energy - efficient, which means they draw less power from your vehicle's electrical system. This can be especially important if you're using a trailer with a limited power supply. Secondly, LED lights have a much longer lifespan. They can last up to 25 times longer than incandescent lights, reducing the need for frequent replacements. Thirdly, LED lights are more durable and resistant to shock and vibration, making them ideal for the rough conditions that trailers often encounter on the road.
Tools and Materials You'll Need
To install LED trailer lights on your flatbed trailer, you'll need the following tools and materials:
- LED trailer lights (Utility Trailer Tail Lights, Led Boat Trailer Tail Lights, or 12v Trailer Lights depending on your needs)
- Wire strippers
- Electrical tape
- Screwdriver
- Drill (if necessary)
- Mounting hardware (screws, bolts, etc.)
- Electrical connectors
- A multimeter (optional but useful for testing the electrical connections)
Step 1: Plan Your Installation
The first step in installing LED trailer lights is to plan your installation. Decide where you want to mount the lights on your flatbed trailer. Typically, you'll want to mount the tail lights at the rear corners of the trailer, and the marker lights along the sides. Make sure the lights are mounted at a height and position that will be visible to other drivers on the road.
Measure the distance between the mounting holes on the lights and mark the corresponding spots on the trailer. If the trailer doesn't have pre - drilled holes, you'll need to drill them using a drill. Make sure the holes are the correct size for the mounting hardware you'll be using.
Step 2: Prepare the Lights and Wiring
Once you've planned the installation, it's time to prepare the lights and wiring. Start by stripping the ends of the wires on the LED lights using wire strippers. You'll need to expose about 1/2 inch of the wire to make a proper connection.
Next, determine the color - coding of the wires on your trailer's electrical system. Most trailer wiring systems use a standard color - coding scheme:


- Brown: Tail lights
- Yellow: Left turn signal and brake light
- Green: Right turn signal and brake light
- White: Ground
Match the wires on the LED lights to the corresponding wires on the trailer's electrical system. You can use electrical connectors to join the wires together. Make sure the connections are secure and insulated with electrical tape to prevent short circuits.
Step 3: Mount the Lights
Now that the lights and wiring are prepared, it's time to mount the lights on the trailer. Place the lights over the pre - drilled or marked holes and insert the mounting hardware. Use a screwdriver to tighten the screws or bolts until the lights are firmly attached to the trailer.
Make sure the lights are level and properly aligned. If the lights are not aligned correctly, they may not be visible to other drivers, which can be a safety hazard.
Step 4: Test the Lights
After mounting the lights, it's important to test them to make sure they are working properly. Connect the trailer to your vehicle and turn on the ignition. Test each of the lights individually: the tail lights, turn signals, and brake lights.
Use a multimeter to check the electrical connections if you're having trouble with the lights. Make sure there is power flowing to the lights and that the connections are secure. If any of the lights are not working, check the wiring connections and make sure the bulbs are properly installed.
Step 5: Secure the Wiring
Once you've tested the lights and confirmed that they are working, it's time to secure the wiring. Use zip ties or electrical tape to secure the wires to the trailer frame. Make sure the wires are not hanging loose or rubbing against any sharp edges, as this can cause damage to the wires and lead to electrical problems.
Troubleshooting Tips
If you encounter any problems during the installation process, here are some troubleshooting tips:
- Lights not working: Check the wiring connections to make sure they are secure. Make sure the bulbs are properly installed and not burned out. Check the trailer's electrical system to make sure there is power flowing to the lights.
- Flickering lights: This can be caused by a loose connection or a problem with the electrical system. Check the wiring connections and make sure they are tight. Use a multimeter to check the voltage at the lights.
- Water damage: If the lights are exposed to water, they may not work properly. Make sure the lights are properly sealed and protected from water. If the lights are damaged, you may need to replace them.
Conclusion
Installing LED trailer lights on a flatbed trailer is a relatively straightforward process that can be completed with a few basic tools and some electrical knowledge. By following the steps outlined in this blog, you can enhance the safety and functionality of your trailer.
As a supplier of Led Trailer Light, I'm here to provide you with high - quality products and support. If you have any questions about the installation process or need assistance in choosing the right lights for your trailer, please don't hesitate to contact us. We're happy to help you with your LED trailer light needs and look forward to discussing potential procurement opportunities with you.
References
- Trailer Lighting Manuals from leading manufacturers
- Online resources on trailer electrical systems and LED lighting technology